Linux
Linux komut satırı notları: dosya sistemi, kullanıcılar, servisler, ağ ve günlük yönetim komutları.
10 min read
How to pronounce Linux
Internet newsgroup participants have long debated the proper pronunciation of Linux. Because the name Linux was conferred by Linux kernel author Linus Torvalds, his pronunciation of the word should reign as standard as I see it. However, Linus is Finnish and his pronunciation of Linux is difficult for English speakers to approximate. Consequently, many variations in pronunciation have arisen. The most popular pronunciation sounds as though the word were spelled Linnucks, with the stress on the first syllable.
You can hear how Linus Torvalds pronounces Linux:

Directory structure
- /boot: Boot loader files
- /etc: Configuration files
- /home: User home directories
- /root: Root home directory
- /opt: Third-party applications
- /dev: Device files
- /var: Variable files
- /bin: User binaries
- /sbin: System binaries
- /usr: User applications
- /proc: Process information
- /mnt: Mount directory
- /sys: Virtual file system
- /media: Removeable devices
- /run: Temporary file system
- /tmp: Temporary files
- /lost+found: Recover broken files
- /lib: System libraries
- /srv: Service data directory
Changing locale
Edit locale.gen and comment out the locale you need, for example tr_TR.UTF-8 UTF-8
nano /etc/locale.genThen run locale-gen command for activation
locale.genChanging tzdata (time zone)
dpkg-reconfigure tzdataListening live stream
mplayer <stream>mplayer -nocache -afm ffmpeg <stream>Some internet radios
apt (aptitude)
/etc/apt/sources.list.d/ is a directory where you can add additional sources for apt. For example, you can add a PPA (Personal Package Archive) to install software that is not available in the default repositories.
# Add a PPAsudo add-apt-repository ppa:example/ppa# Update package listsudo apt update# Install a packagesudo apt install package-name*.sources files are used to define additional sources for apt.
Types: debURIs: https://us-central1-apt.pkg.dev/projects/antigravity-auto-updater-dev/Suites: antigravity-debianComponents: mainArchitectures: amd64Signed-By: /etc/apt/keyrings/antigravity-repo-key.gpgTypes: deb deb-srcURIs: https://deb.torproject.org/torproject.org/Suites: trixieComponents: mainArchitectures: amd64Signed-By: /usr/share/keyrings/deb.torproject.org-keyring.gpgConverting video
ffmpeg -i video1.m4v -acodec copy -vcodec copy -f mov video1.movSplitting video
ffmpeg -i ORIGINALFILE.mp4 -acodec copy -vcodec copy -ss START -t LENGTH OUTFILE.mp4where START is starting positing in seconds or in format hh:mm:ss LENGTH is the chunk length in seconds or in format hh:mm:ss
If let’s say your video is 31 minutes long and you want so split into 15 min chunks here is how you run it:
ffmpeg -i ORIGINALFILE.mp4 -acodec copy -vcodec copy -ss 0 -t 00:15:00 OUTFILE-1.mp4ffmpeg -i ORIGINALFILE.mp4 -acodec copy -vcodec copy -ss 00:15:00 -t 00:15:00 OUTFILE-2.mp4ffmpeg -i ORIGINALFILE.mp4 -acodec copy -vcodec copy -ss 00:30:00 -t 00:31:00 OUTFILE-3.mp4Commands
To set home directory
usermod –d /home/user1/To set root gid and groups for the user1
usermod –g 0 –G 0 user1To change access rights for a directory
chmod 777 /var/www/directoryTo remove package with configuration files
aptitude remove --purge package-nameTo remove old configuration files
dpkg --purge package-nameTo combine .rar files using unrar
unrar e -kb part01.rarRarCrack
rarcrack p1r.part1.rarCreating symbolic link (There is no ”/” sign at the end)
ln -s /var/www/existing /var/www/newnameBurning an ISO image to CD-ROM
apt-get install cdrecord
cdrecord -scanbus... snip ...
1,0,0 100) 'HDT72251' '6DLAT80 ' 'V43O' Disk
1,1,0 101) *
1,2,0 102) *
... snip ...

cdrecord -dev 1,0,0 /tmp/output.iso
Removing kernel
uname –adpkg --list 'linux-image*'sudo aptitude remove linux-image-2.6.18-5-686Sources List, http://www.debian.org/doc/manuals/apt-howto/ch-basico.en.html
nano /etc/apt/sources.listTrace a program (ex. pidgin)
strace -v -i -s 9999 $( which pidgin ) >| strace.log 2>&1nc
To check if a port is free, run the following command:
$ nc localhost 56733 < /dev/null; echo $?If the output of the command above is 1, then the port is free and usable.
xattr (extended attributes)
Delete ‘Where From’ metadata from files
xattr /Path/To/FileYou’ll get a key named com.apple.metadata:kMDItemWhereFroms. To delete this key in the Terminal, run:
xattr -d com.apple.metadata:kMDItemWhereFroms /Path/To/FileMount External HDD (NTFS)
Install ntfs-3g library
aptitude install ntfs-3gShows all the disk drives
fdisk -lTo make writable mount
mount /dev/sda1 /mnt/sda1 -t ntfs-3g -o rw,umask=0022,uid=dev,gid=devMount NTFS partition
umask is a filter of permissions, so it works in the opposite way to chmod. Full permissions are equivalent to 777 (rwxrwxrwx). A umask of 0222 (-w—w—w-) leaves 555 (r-xr-xr-x).
mount /dev/sda1 /mnt/sda1 -t ntfs -r -o umask=0222,uid=dev,gid=dev-rwxr-x--- 1 dev dev 28096 Aug 24 1996 chkdsk.exe
umount /mnt/sda1/To make writable mount
mount /dev/sda1 /mnt/sda1 -t ntfs-3g -o rw,umask=0022,uid=dev,gid=devMount an ISO image
Under UNIX and Linux like oses a loop device (a pseudo-device) can make a file accessible as a block device. It is is often used for CD / DVD ISO images and floppy disc images. Mounting a file containing a filesystem via such a loop mount makes the files within that filesystem accessible. They appear in the mount point directory.
Open terminal and create a mount point:
sudo mkdir /home/user/isoIf your iso image is at /tmp/file.iso, type the following to mount it:
sudo mount -o loop /tmp/file.iso /home/user/isoTo unmount type the command:
sudo umount /home/user/isoAccurate Platform Detection
shtool platform -v -F "%sc (%ac) %st (%at) %sp (%ap)"cat /etc/*-releaseNetwork Testing Basics
Install netkit-ping, traceroute, dnsutils, ipchains (for 2.2 kernel), iptables (for 2.4 kernel), and net-tools packages and:
ping google.com # check Internet connectiontraceroute google.com # trace IP packetsifconfig # check host configroute -n # check routing configdig [@dns-server.com] host.dom [{a|mx|any}] |less # check host.dom DNS records by dns-server.com for a {a|mx|any} recordipchains -L -n |less # check packet filter (2.2 kernel)iptables -L -n |less # check packet filter (2.4 kernel)netstat -a # find all open portsnetstat -l --inet # find listening portsnetstat -ln --tcp # find listening TCP ports (numeric)How to format a hard drive in linux
To create partition on hard drive B
cfdisk /dev/sdbChoose New, Primary and then Write and Quit
To format 1st partition on hard drive B
mkfs /dev/sdb1convert images to pdf
Use convert program (it is an executable installed as part of Imagemagick suite of tools):
convert 'p%d.jpg[1-148]' file.pdfconvert "*.{ext1,ext2,ext3,...}" -quality 100 outfile.pdfConvert svg to png
Change dpi, width and height
inkscape input.svg --export-filename=output.png --export-dpi=300 --export-width=1500 --export-height=500Create favicon.ico
Using netpbm and GIMP
Install netpbm and GIMP
aptitude install netpbm gimpStep # 1: Convert logo to ppm raw format
- Open your logo using GIMP
- Now cut and paste logo in square
- Next resize logo by visiting Image > Scale image option. Set pixel size to 16 x 16 or 32 x 32 or 48 x 48.
- Next click on File > Save as > Enter file name as favicon.ppm > Click on Save > Raw Encoding > Ok
Step # 2: Convert portable pixmaps into a Windows .ico file
ppmtowinicon -output favicon.ico favicon.ppmUsing imagemagick
Install imagemagick first
brew install imagemagickand use convert tool
convert -background transparent icon.png -define icon:auto-resize=16,32,48,64,256 icon.icoHow to cycle through reverse-i-search in BASH?
To cycle through alternatives by repeatedly hitting Ctrl+R
E.g.:
Ctrl+R grep Ctrl+R Ctrl+R ...Convert png image to jpg with white background
mogrify -format jpg -background white -flatten *.pngxattr
Using the xattr command, you can inspect the extended attributes:
$ xattr s.7zcom.apple.metadata:kMDItemWhereFromscom.apple.quarantineand use the -d option to delete one extended attribute:
$ xattr -d com.apple.quarantine s.7z$ xattr s.7zcom.apple.metadata:kMDItemWhereFromsyou can also use the -c option to remove all extended attributes:
$ xattr -c s.7z$ xattr s.7zChecking the SHA-256 checksum
You can compare the SHA-256 checksum of your downloaded binary against the checksums that are provided for every release. To generate a SHA-256 checksum of your downloaded binary, then open the corresponding checksum file and ensure that it contains the same number.
$ shasum -a 256 downloaded_binary.tar.gzGetting all files from a web page using wget
For downloading files from a directory listing, use -r (recursive), -np (don’t follow links to parent directories), and -k to make links in downloaded HTML or CSS point to local files
wget -r -np -k [web_address]Other useful options:
- -nd (no directories): download all files to the current directory
- -e robots.off: ignore robots.txt files, don’t download robots.txt files
- -A png,jpg: accept only files with the extensions png or jpg
- -m (mirror): -r —timestamping —level inf —no-remove-listing
- -nc, —no-clobber: Skip download if files exist
How to repartition and format a USB Stick
If your disk has been formatted incorrectly or has multiple partitions on it, its capacity may appear to be less than it should be. To fix this and regain full capacity, you need to repartition and format the disk.
To find out which disk is your USB drive
diskutil listIf the disk is /dev/disk2, to format the disk
sudo diskutil eraseDisk FAT32 USBNAME MBRFormat /dev/disk2How to Make a Bootable USB Stick from an ISO File
How to create a Windows 11 bootable USB from macOS
Use balenaetcher
brew install balenaetcheror from Mac
- Download the desired file
- Convert the .iso file to .img using the convert option of
hdiutil:
hdiutil convert -format UDRW -o /path/to/target.img /path/to/source.isoNote: OS X tends to put the .dmg ending on the output file automatically. Rename the file by typing:
mv /path/to/target.img.dmg /path/to/target.img-
Run
diskutil listto get the current list of devices -
Insert your flash media 5 .Run
diskutil listagain and determine the device node assigned to your flash media (e.g. /dev/disk2) -
Run
diskutil unmountDisk /dev/diskN(replace N with the disk number from the last command - in the previous example, N would be 2) -
Execute
sudo dd if=/path/to/downloaded.img of=/dev/rdiskN bs=1m(replace /path/to/downloaded.img with the path where the image file is located; for example, ./ubuntu.img or ./ubuntu.dmg).
Note: Using /dev/rdisk instead of /dev/disk may be faster.
Note: If you see the error dd: Invalid number ‘1m’, you are using GNU dd. Use the same command but replace bs=1m with bs=1M.
Note: If you see the error dd: /dev/diskN: Resource busy, make sure the disk is not in use. Start the ‘Disk Utility.app’ and unmount (don’t eject) the drive.
- Run
diskutil eject /dev/diskNand remove your flash media when the command completes
Now the USB stick is ready. Boot the device that you want from the USB stick.
sha3sum: Keccak, SHA-3, SHAKE, and RawSHAKE checksum utilities
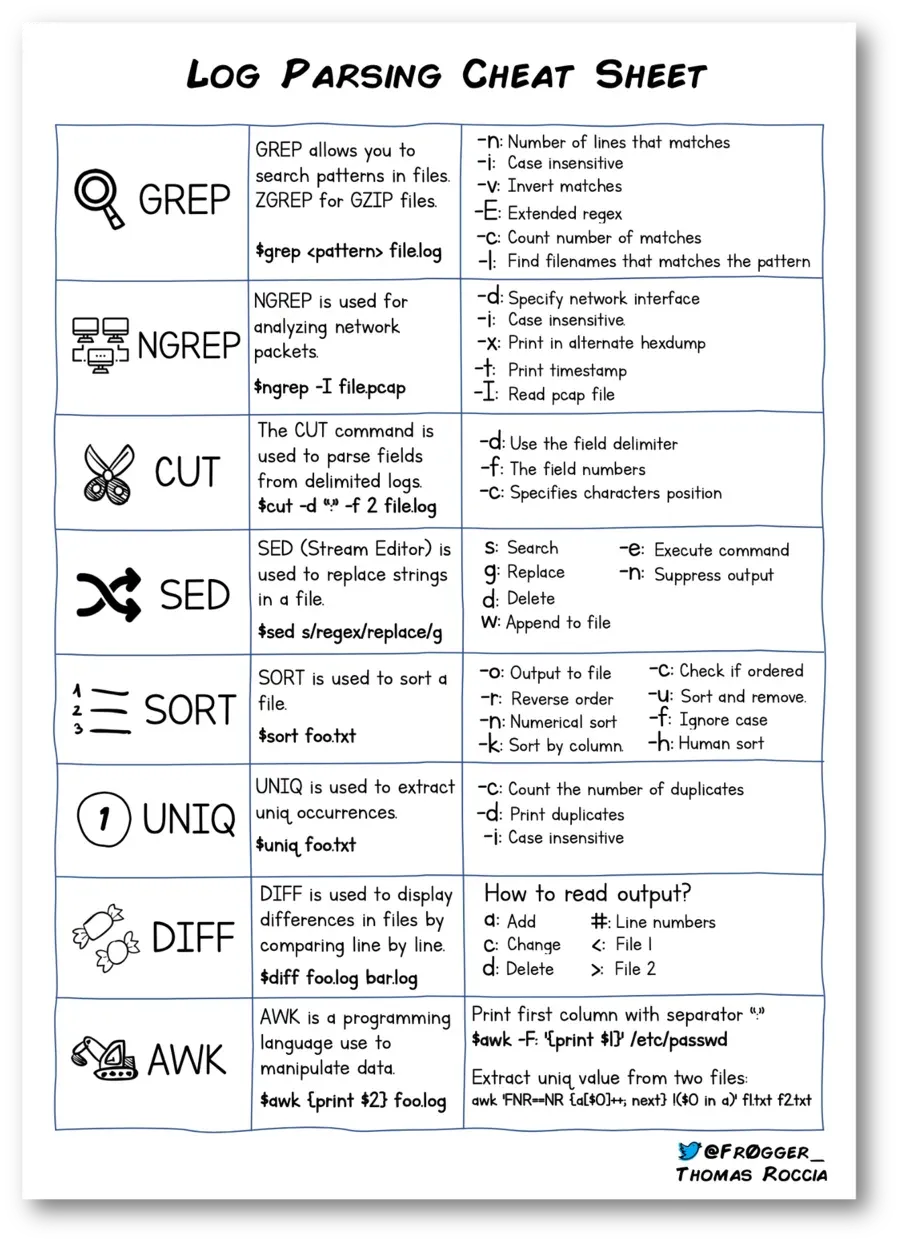
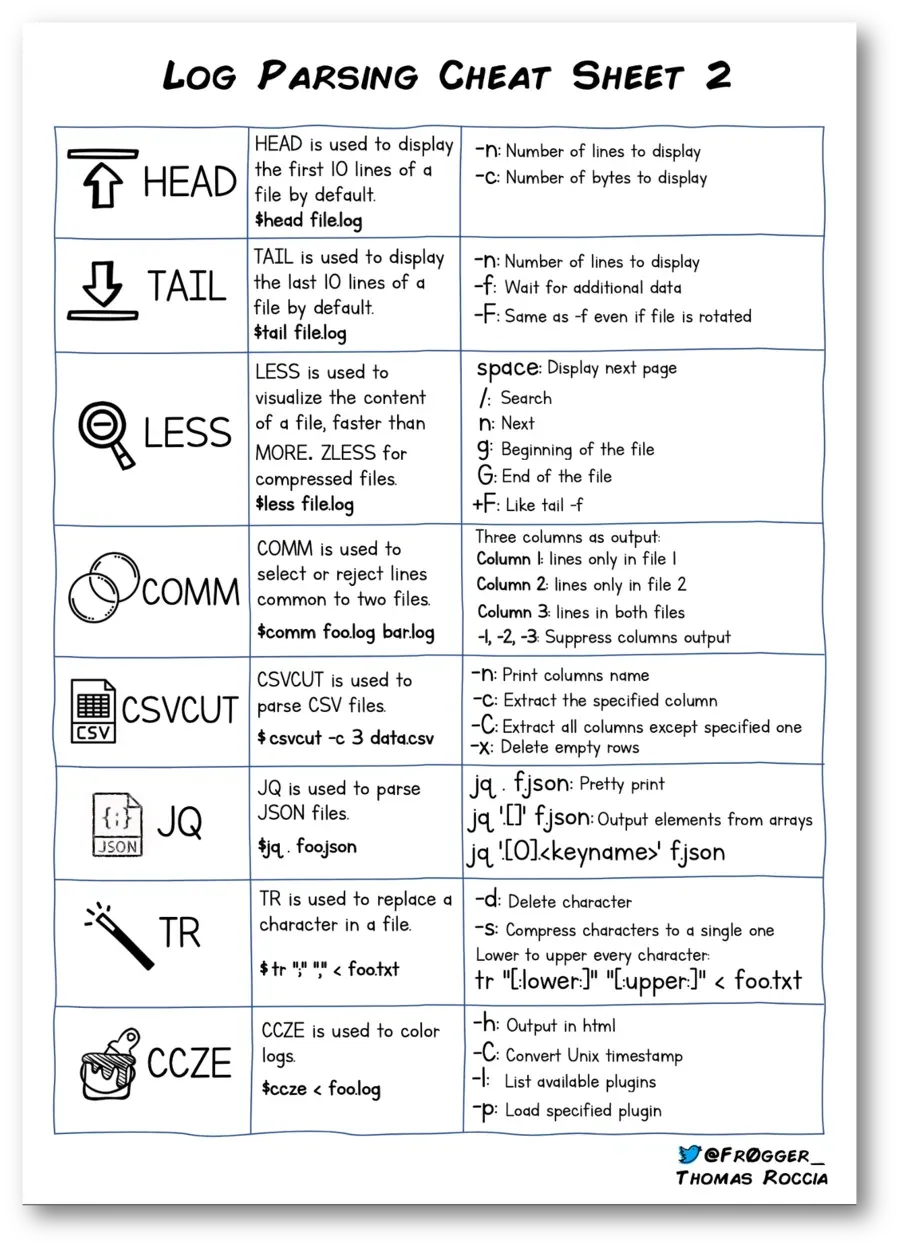
sha3sum somefile.txt > somefile.txt.sha3cat somefile.txt.sha3765597429418c1b6e4a0d1ad52f2e3feb39c09e0709290571afad07f somefile.txtLog Parsing Cheat Sheet
Finding and counting duplicate filenames
find . -name "*.java"|awk -F"/" '{a[$NF]++}END{for(i in a)if(a[i]>1)print i,a[i]}'Modemin WAN şifresini bulmak
*Superonline WAN/Fiber kullanıcı şifresi öğrenme *Modemin WAN şifresini bulmak
Modemdeki WAN kablosunu sökün. Kablosuz kullanıyorsanız modem ile bağlantı yapmak için ethernet kablosu gerekiyor. Kablolu da kablosuz da bağlansanız, ethernet kablosunun bir ucunu bilgisayarınıza bağlayın, diğer ucunu ise modemin WAN girişine bağlayın.
sudo suapt install pppoepppoe paketi yüklendikten sonra uçbirimi kapatmayın. etc/ppp dizinine gidin. Bunun için yine sol altta Files/Dosyalar kısayoluna tıklayın, dosya yöneticisi açılacak. Sol tarafta File System/Dosya Sistemi’ne tıklayın. Sonra sırasıyla etc ve ppp klasörlerine tıklayın. ppp klasöründe pppoe-server-options adında yeni belge oluşturmanız gerekiyor. Boşluk olan kısma sağ tıklayıp, Open as root/Yönetici haklarıyla aç’a basın. Başka bir pencerede aynı klasör açılacak, ancak yukarıda Elevated Privileges/Yükseltilmiş Ayrıcalıklar yazması gerek. Create New Document/Yeni Belge Oluştur’dan pppoe-server-options isimli boş belgeyi oluşturun. Yine aynı pencereden oluşturduğunuz dosyayı açıp içine aşağıdakileri kopyalayıp, kaydedip belgeyi kapatın.
require-paploginlcp-echo-interval 10lcp-echo-failure 2show-passworddebuglogfile /var/log/pppoe-server-logBundan sonraki işlem ise pap-secrets isimli belgenin içine aşağıdaki kodu eklemek. xxxxx yerine ise kendi fiber kullanıcı adınızı yazacaksınız. Modem arayüzünden bakabilirsiniz kullanıcı adınıza. Kodu ekledikten sonra kaydetmeyi unutmayın.
# Secrets for authentication using PAP# client server secret IP addresses"xxxxx@fiber" * ""Uçbirimde kaldığımız yerden devam ediyoruz. Aşağıdaki kodları sırasıyla yazın.
touch /var/log/pppoe-server-logchmod 0774 /var/log/pppoe-server-logBir sonraki komut için kendi bilgisayarınıza göre düzenleme yapmanız gerekiyor. Bunun için öncelikle aşağıdaki komutu yazın.
iwconfig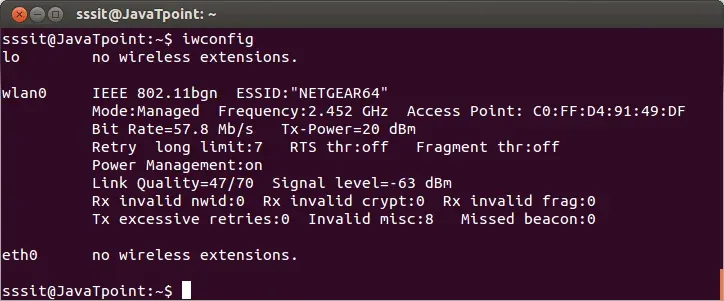
Uçbirim bu şekilde bir çıktı verecektir. E ile başlayan çıktıyı sıradaki komutta kullanmamız gerekiyor. Örneğin burada eth0 olarak verdiği için sıradaki komut aşağıdaki şekilde olmalı. Ayrıca kendi çıktınıza göre düzenlediğiniz komutu vermeden önce belirttiğim şekilde bilgisayarınız ile modem arasındaki bağlantıyı kurun.
pppoe-server -F -I eth0 -O /etc/ppp/pppoe-server-optionsKomutu verdikten sonra uçbirim çalışmaya devam edecek. Mevcut olan uçbirimi kapatmadan, yeni bir uçbirim açın ve aşağıdaki komutu verin.
sudo tail -f /var/log/pppoe-server-logEkrana çıktılar gelmeye başlayacak. Çıktılar arasında kullanıcı adınız ve şifreniz de olacak. Kimi bilgisayarda 1-2 dakika kadar beklemeniz gerekebilir şifre çıktısı için. Şifrenizi aldıktan sonra modeminizi kapatın, normal bağlantılarını yapıp tekrar başlatın.